Single Visit Reports are one of the most commonly used workflows in the Builterra Pro app, providing a simple and consistent way to document site conditions, photo reports, SUE activities, and daily field observations. This guide walks you through the entire process—from logging into the app and creating a new inspection to submitting and reviewing your report. By the end of this article, you’ll be able to confidently capture field data, attach photos, and generate professional reports directly from your mobile device.
TABLE OF CONTENTS
- Preliminary Thoughts
- Logging into the Builterra Pro App
- Creating a New Inspection
- Populating your Inspection
- Adding Photos to your Report
- Submitting your Report
- Reviewing your Report
- Final Thoughts
- Next steps
- Recommended Articles
Overview
A Single Visit Report is one of the most commonly used workflows in the Builterra Pro app. Whether you’re documenting Photo Reports, SUE Reports, or daily site observations, this process provides a clear, consistent way to record field activities and generate professional inspection reports.
This article walks you through each step of creating and completing a Single Visit Report, from logging in to marking the report as reviewed. By the end, you’ll be able to confidently complete inspections in the field and submit reports directly from your mobile device.
Logging into the Builterra Pro App
Access to your reports begins with logging into the Builterra Pro mobile app.
1. Open the Builterra Pro app on your device.
2. Enter your Builterra credentials(or use Microsoft SSO if your organization has enabled it).

3. Choose the correct account if you’re associated with multiple accounts.
4. Select your project. You can:
Search by project name.
Scroll through the list.
Tap the Favorites filter to quickly access projects you’ve marked as favorites.
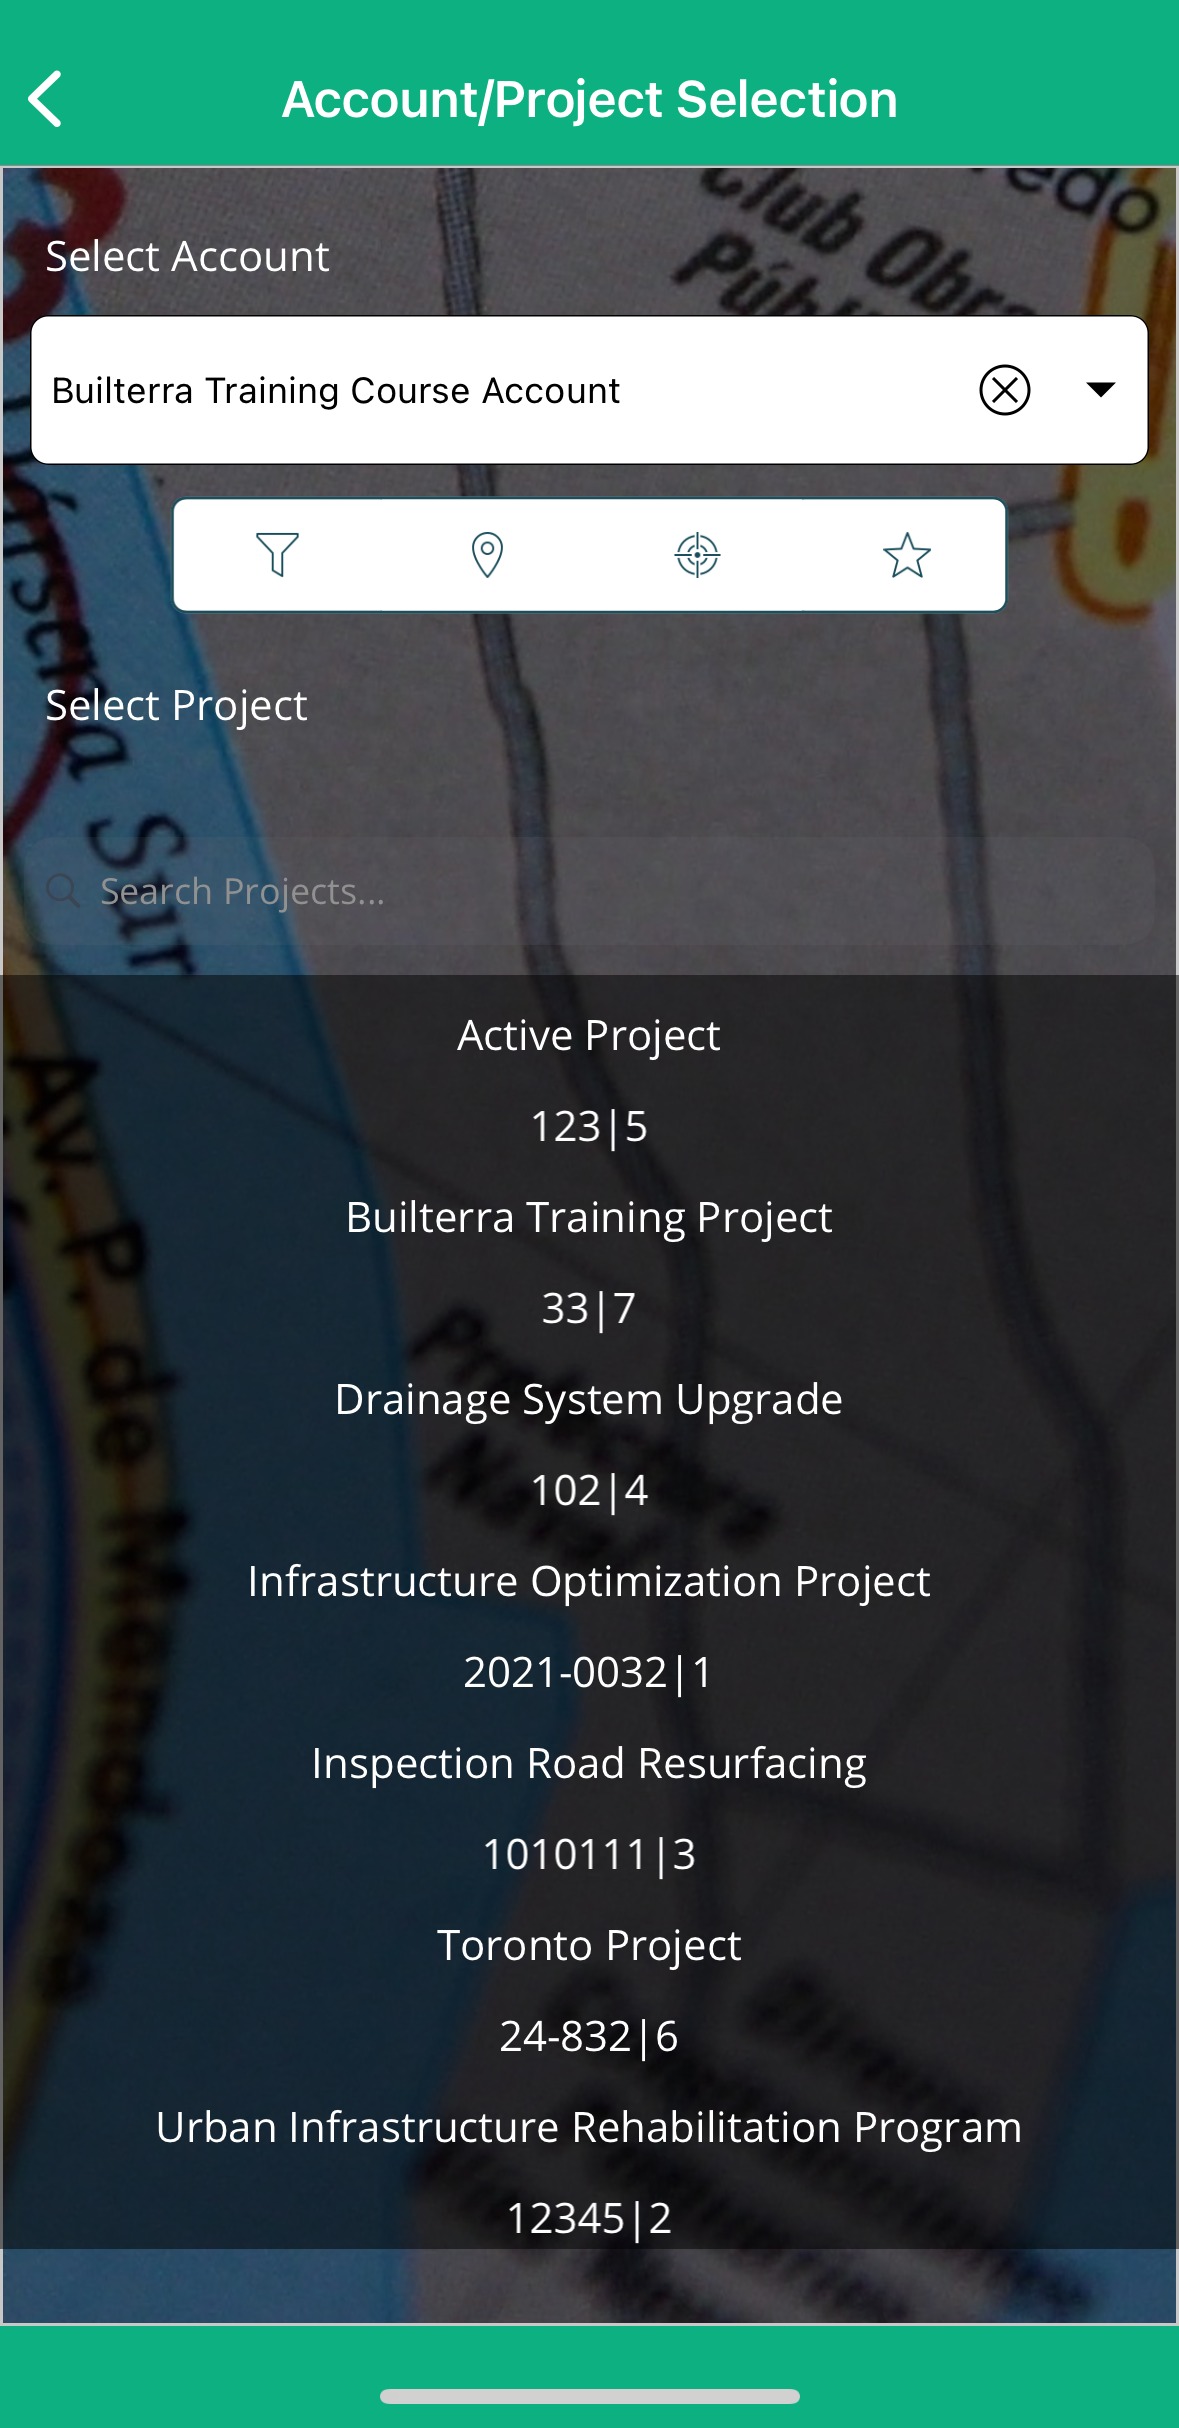
Tip: Project data automatically syncs from the Builterra web portal to your mobile app, so you’re always working with the most up-to-date information.
Creating a New Inspection
1. Once you’ve selected your project, navigate to the Forms section on the main screen. Once you've picked your project, head over to the Forms section of the main Builterra Pro screen.

2. Select the form that matches your inspection type. Once you've figured out which form suits your needs, tap on it. Then, hit the Blue Plus button to create a new Inspection Report. From there, you're all set to start recording your observations and progress smoothly right within the app.
IMAGE HERE
3. Tap the blue “+” button to create a new inspection report.

4. Tap Get Location to automatically capture your GPS coordinates and current weather conditions, linking them to your report.
Populating your Inspection
1. General Tab
Enter the Report Name.
Add any Internal Notes (these will not appear in the final report; they are for your team’s use only).
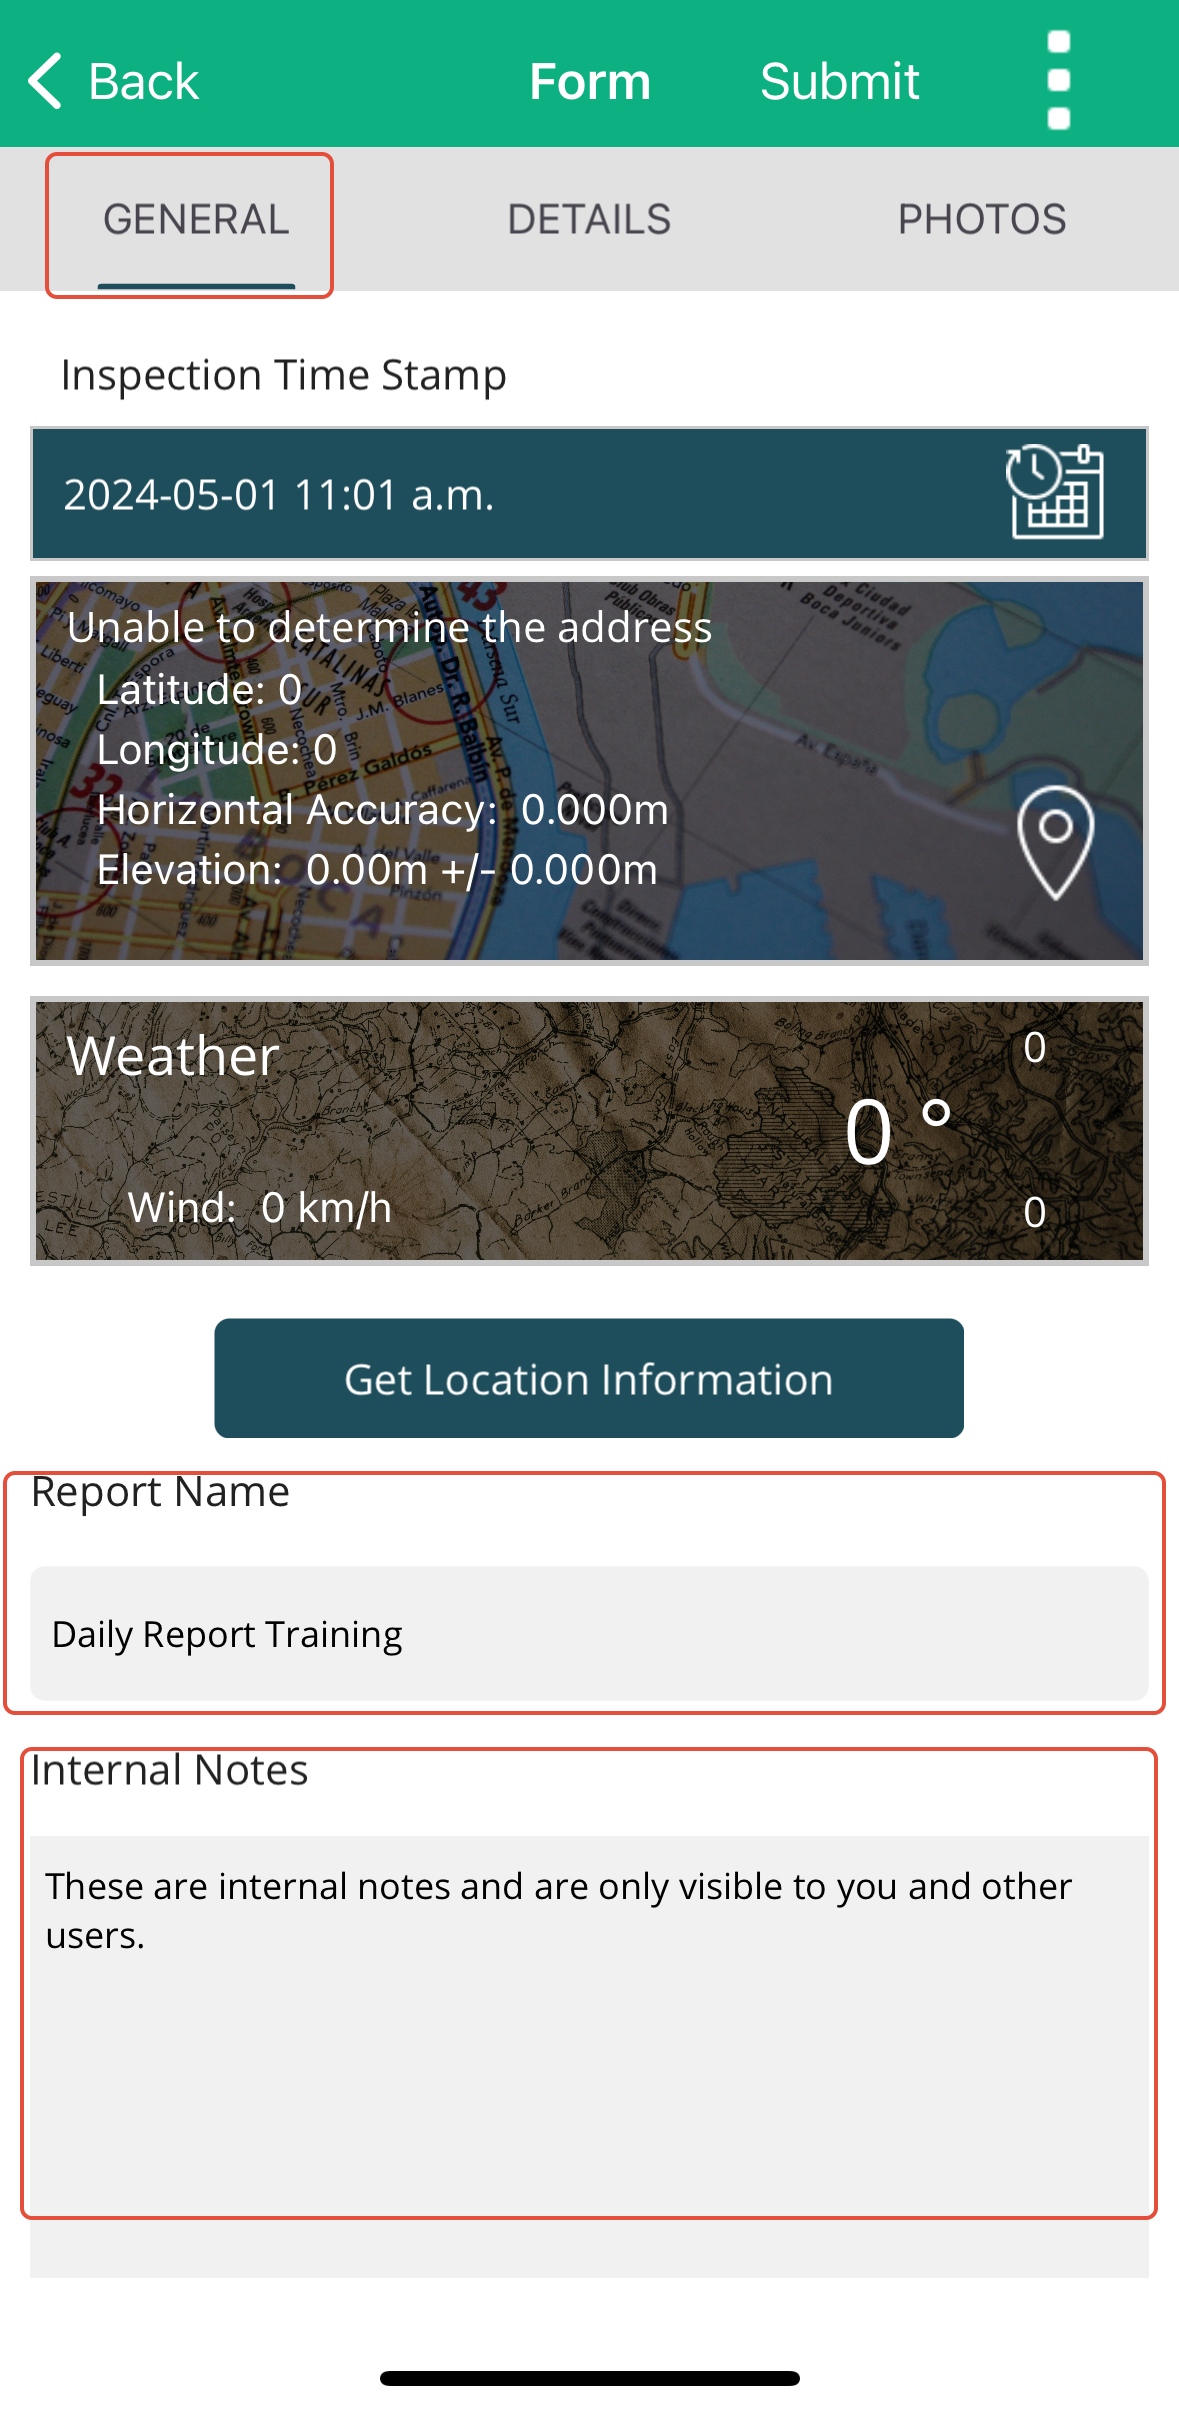
These details are for internal use only and won't appear in the report once distributed.
2. Details Tab
Populate all required fields as determined by your Account Administrator.
Some fields may be mandatory to ensure consistency and completeness across all inspection reports.
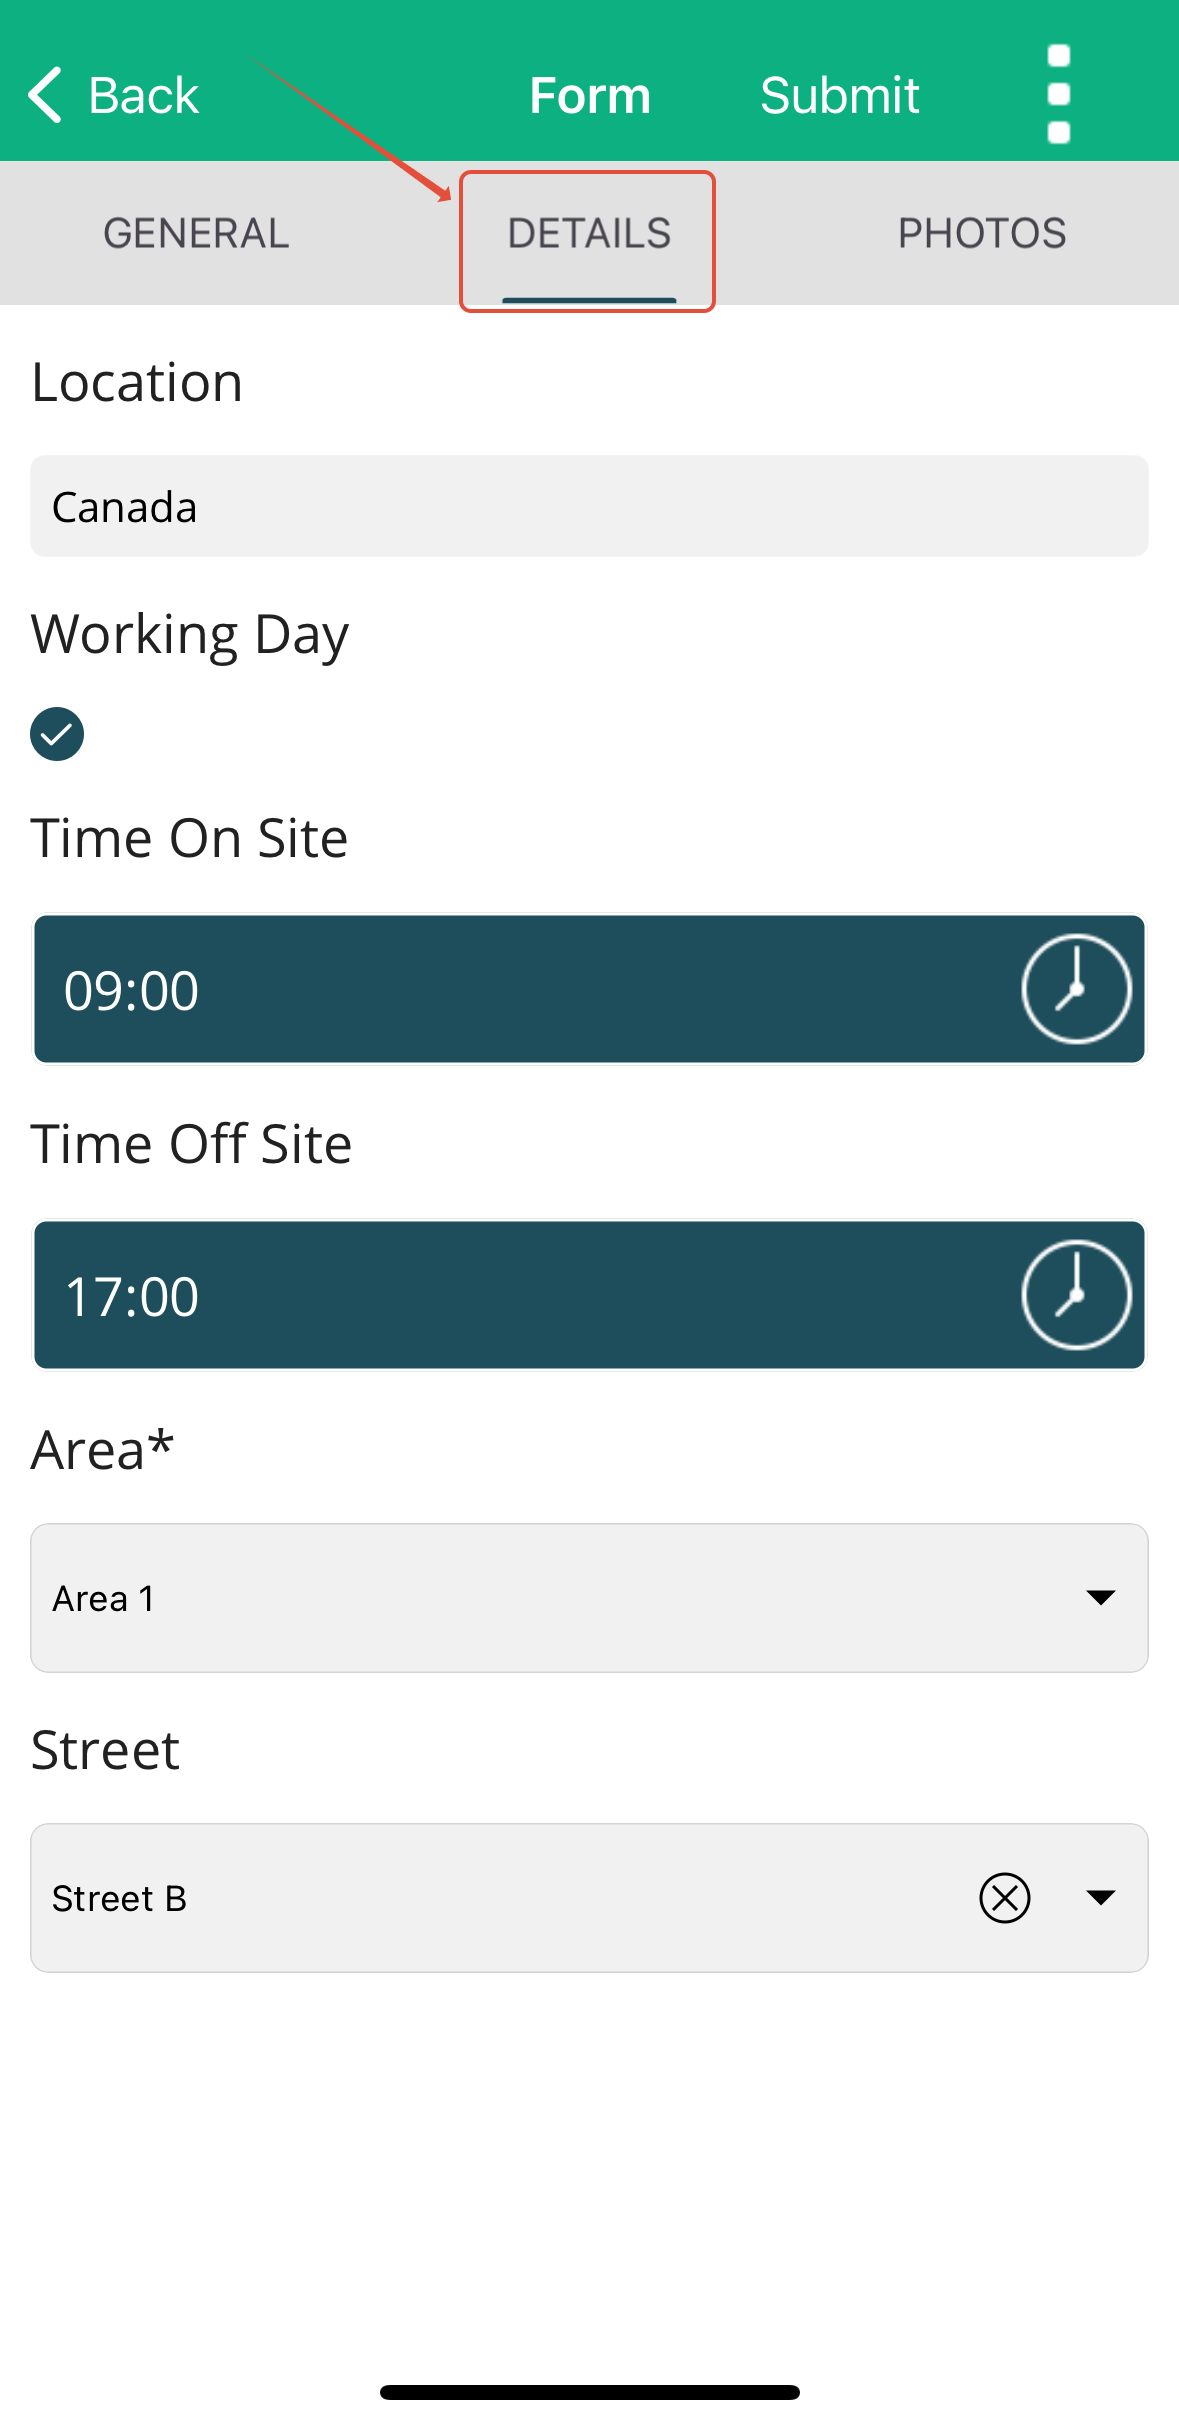
Take your time here — accurate and detailed entries make your final report more valuable and professional.
Adding Photos to your Report
Photos are a key part of documenting site conditions. The Builterra Pro app makes adding them straightforward:
1. Tap Add Photo/Sketch to begin. 
2. Choose from:
Uploading from your device’s gallery.
Capturing a new photo in real time.
Creating a sketch directly in the app.

3. Each image is automatically timestamped and stored within the report.
4. Use annotations to highlight specific details or illustrate changes.
Best Practice: Include at least one photo in every inspection to provide visual context.
Submitting your Report
When you’re finished entering data:
1. Tap Submit to upload your report to the Builterra server.
2. Once submitted, the report becomes accessible in both the Builterra Inspect Portal (web) and the Builterra Pro mobile app. 
3. If you’re working offline or waiting for additional information, you can save the report as a draft. Drafts remain stored locally on your device until submitted.
After submission, you’ll have the ability to:
Edit the Parent Form.
Review the generated PDF report.
Add Sub-Inspections if needed.
Reviewing your Report
The Mark Reviewed feature allows inspectors to certify that the report is accurate and complete:
Open your submitted report.
Tap the three white dots in the top-right corner.
Select Mark Reviewed.
This action:
Closes the report.
Adds your digital signature from your Builterra profile.
Note: Not all reports require a signature. Confirm requirements with your Account Administrator before using this feature.
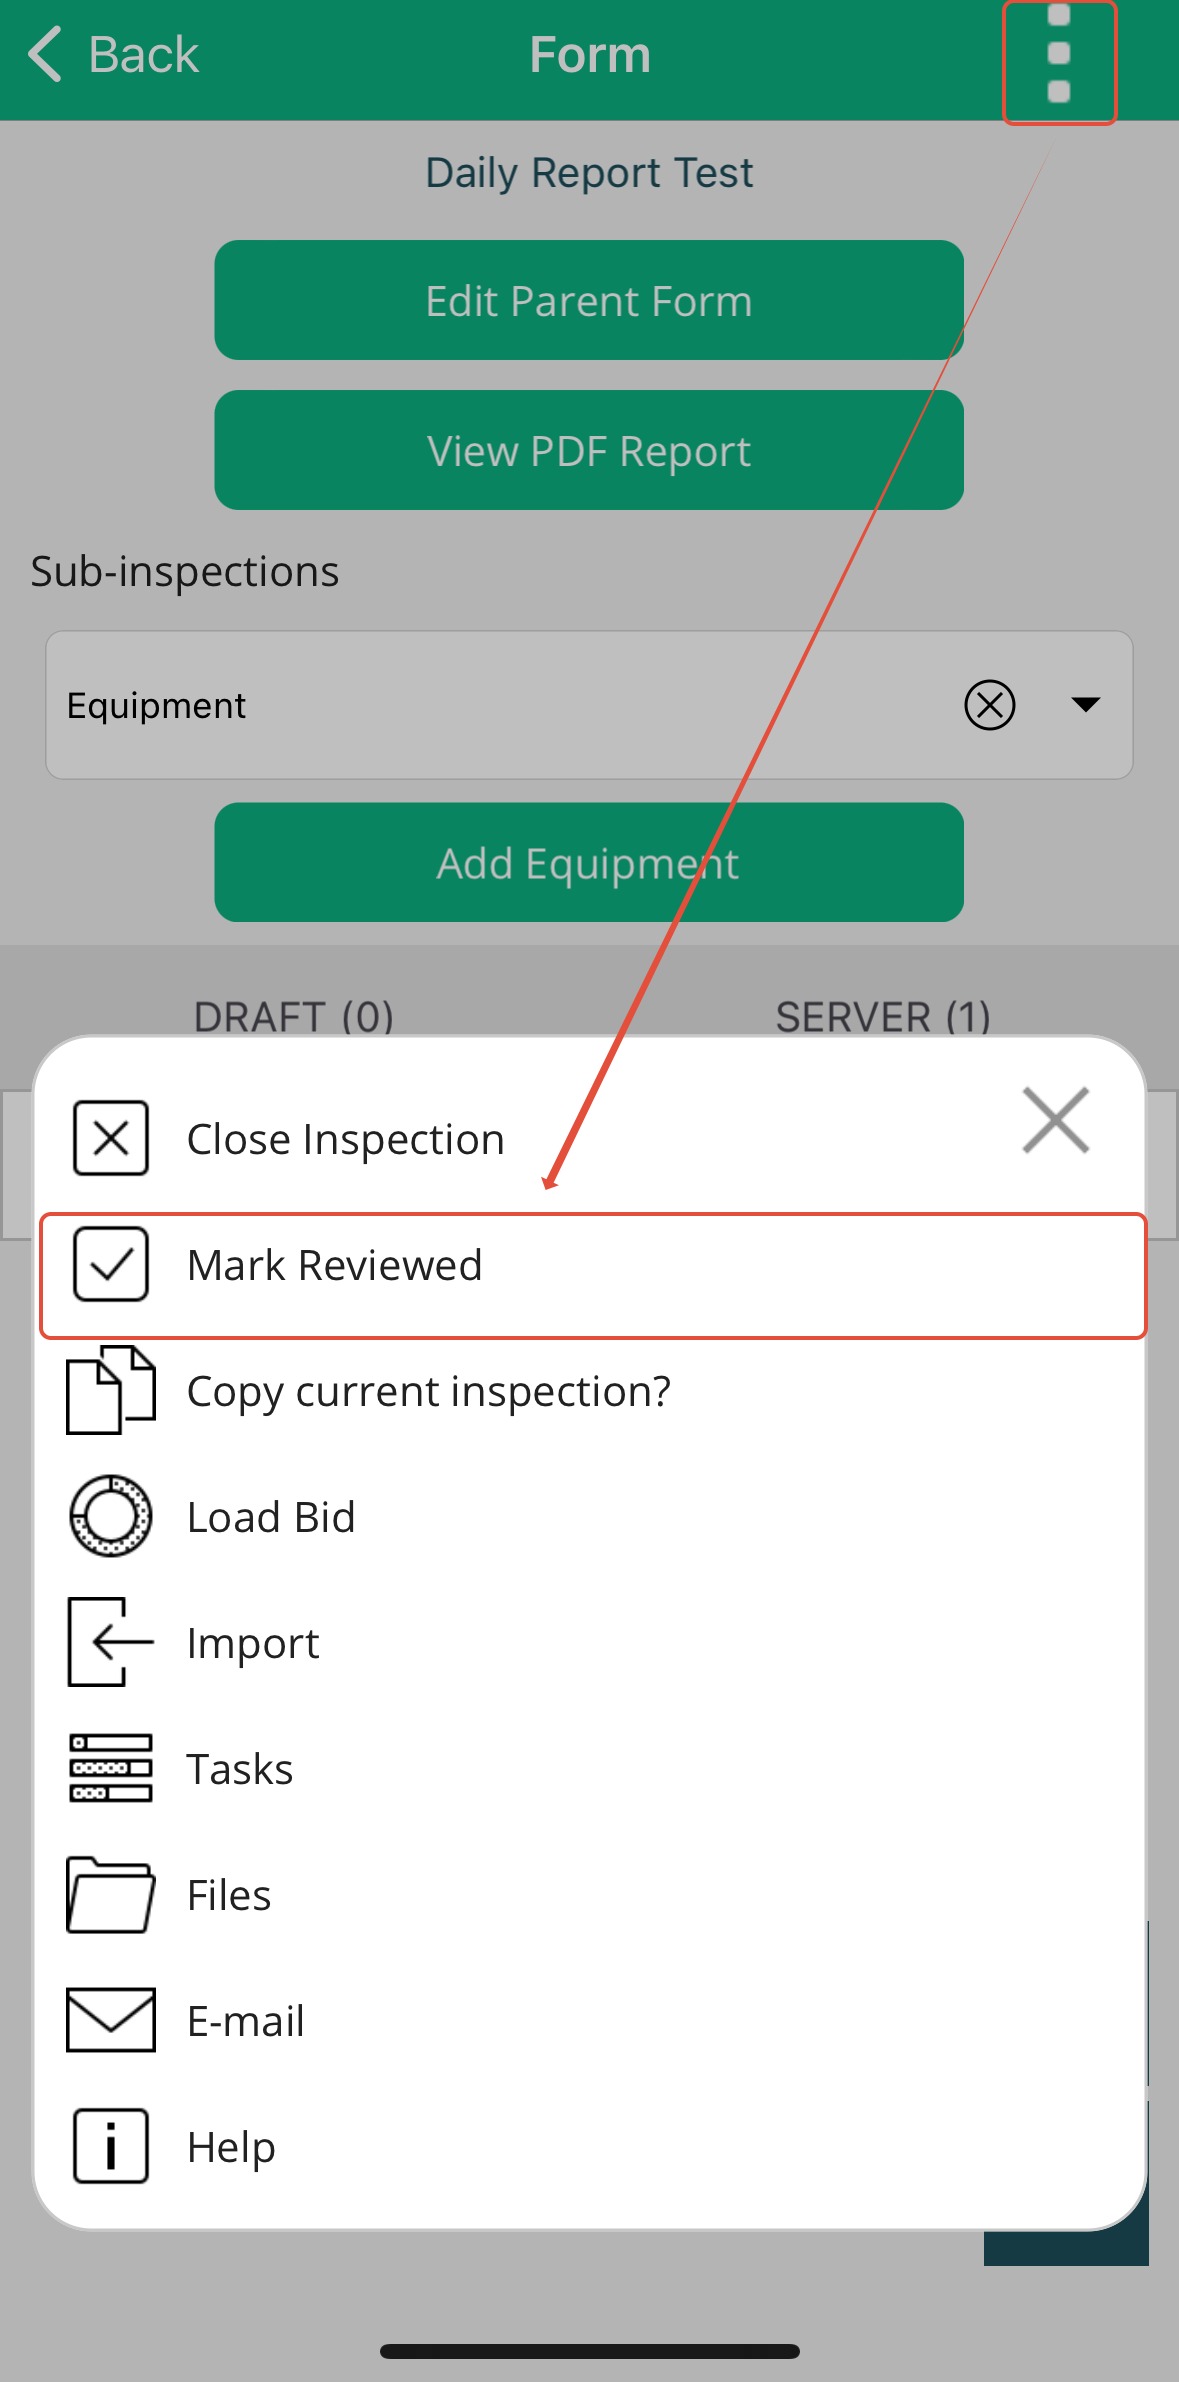
This action marks the report as 'Closed' and adds your signature from your Builterra profile to the report.
Not all reports require or support a signature, so it's best to check with your Builterra Account Admin beforehand.
Final Thoughts
By following this guide, you’ve learned the full workflow for creating, populating, and submitting a Single Visit Report in the Builterra Pro app. This process ensures your field data is captured consistently and made available to your team in real time.
For a visual walkthrough, check out our training video on creating Single Visit Reports and Daily Inspections.
Next steps
Now that you’re comfortable creating Single Visit Reports, you may want to explore:
Customizing Builterra Pro Settings – Adjust the app to suit your workflow.
Creating Multi Visit Reports – Learn how to document inspections across multiple site visits.
Don’t forget to let us know if this article was helpful by leaving feedback below.
Recommended Articles
How to Create & Complete Mobile TasksHow do I Create a Multi Visit ReportHow do I Configure my Builterra Pro App
Was this article helpful?
That’s Great!
Thank you for your feedback
Sorry! We couldn't be helpful
Thank you for your feedback
Feedback sent
We appreciate your effort and will try to fix the article