Multi-Visit Reports in the Builterra Pro app allow inspectors to document site activities and observations across multiple days or stages of a project under a single parent inspection. This article walks you through the complete workflow—from creating a parent inspection and submitting it, to adding sub-inspections, photos, and final approvals. By the end of this guide, you’ll be able to confidently manage ongoing inspections, maintain consistent documentation, and produce clear, professional reports for multi-day site activities.
TABLE OF CONTENTS
- Preliminary Thoughts
- Logging into the Builterra Pro App
- Creating a New Inspection
- Adding Photos
- Submitting the Parent Inspection
- Adding Sub-Inspections
- Marking as Reviewed
- Final Thoughts
- Next steps
- Recommended Articles
Overview
A Multi-Visit Report allows inspectors to document site activities and observations across multiple days or stages of a project, all under one parent inspection. This is especially useful for Daily Reports, progress tracking, or multi-step inspections that require consistent documentation over time.
This guide will walk you through the process of creating, populating, and submitting a Multi-Visit Report using the Builterra Pro mobile app. By the end, you’ll know how to manage parent inspections, add sub-inspections, and finalize reports with confidence.
Logging into the Builterra Pro App
1. Open the Builterra Pro mobile app on your device.
2. Enter your Builterra credentials (or use Microsoft SSO if enabled by your organization).
3. If you’re connected to multiple accounts, select the appropriate account.
4. Choose your project by:
Searching by name,
Scrolling through the list, or
Tapping the Favorites Star to quickly access saved projects.

Tip: Builterra automatically syncs data between the web portal and mobile app, so you’re always working with the most up-to-date project information.
Select the suitable account from the available options and choose the specific project. Using the Favorite Star button will help you navigate to your favorited projects easily.
Creating a New Inspection
Creating Inspections not only prompts the start of the inspection process but also grants you access to a comprehensive array of forms and fields essential for data input and documentation.
1. From your project’s main screen, tap the Forms button. 
2. Select the desired inspection form (e.g., Daily Report).
3. Tap the blue “+” button to create a new parent inspection.
 |  |
4. Tap Get Location to automatically capture your GPS coordinates and weather conditions. 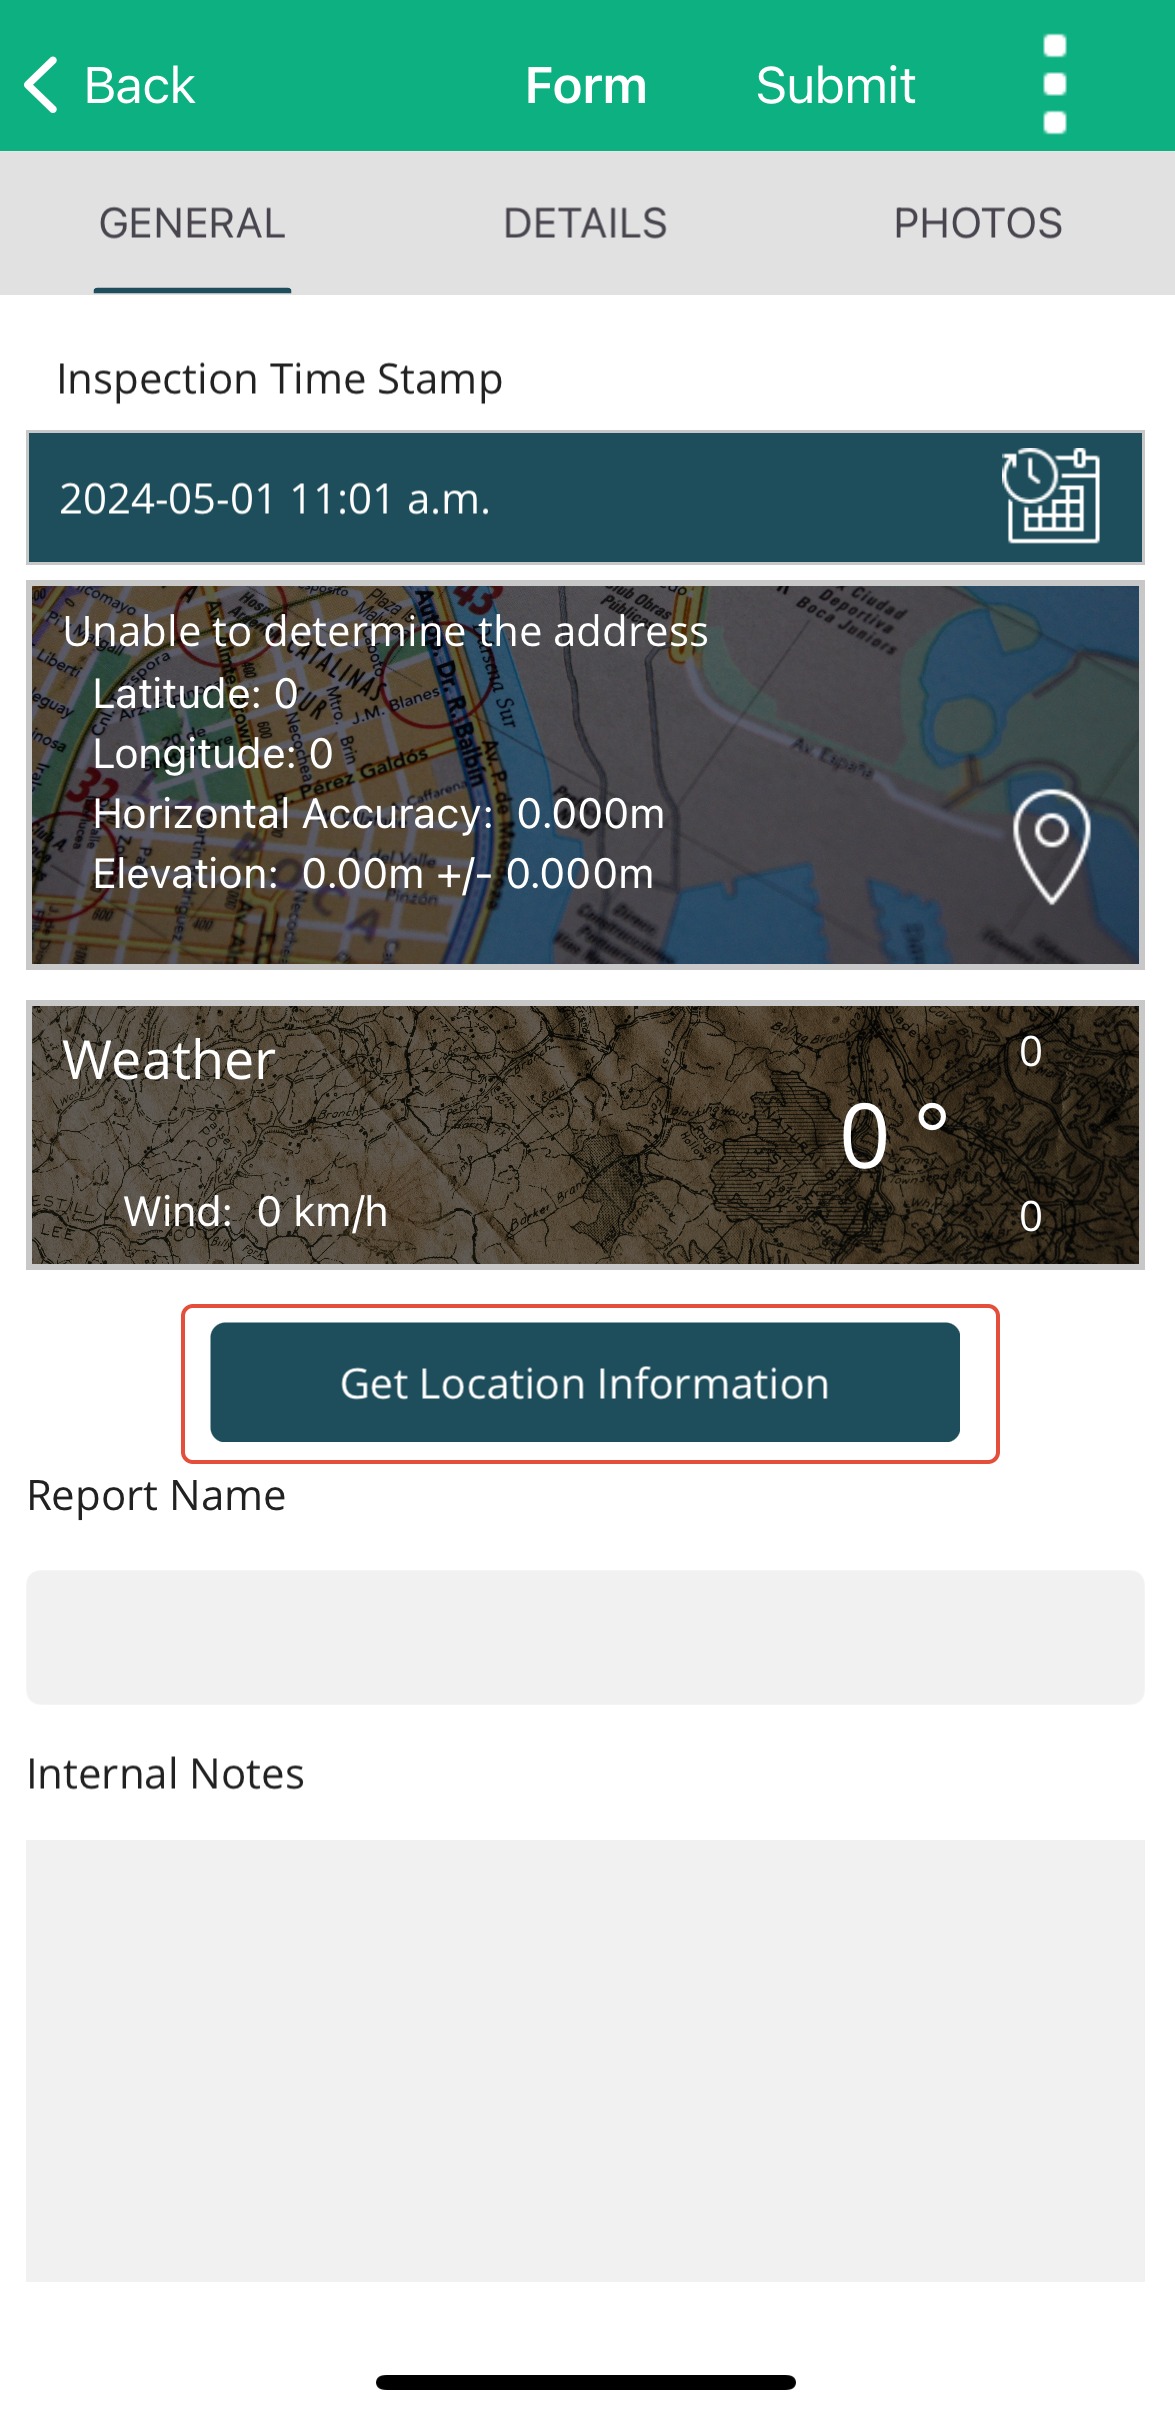
5. In the General Tab:
Enter a Report Name.
Add any internal notes (these will not appear in the final distributed report).

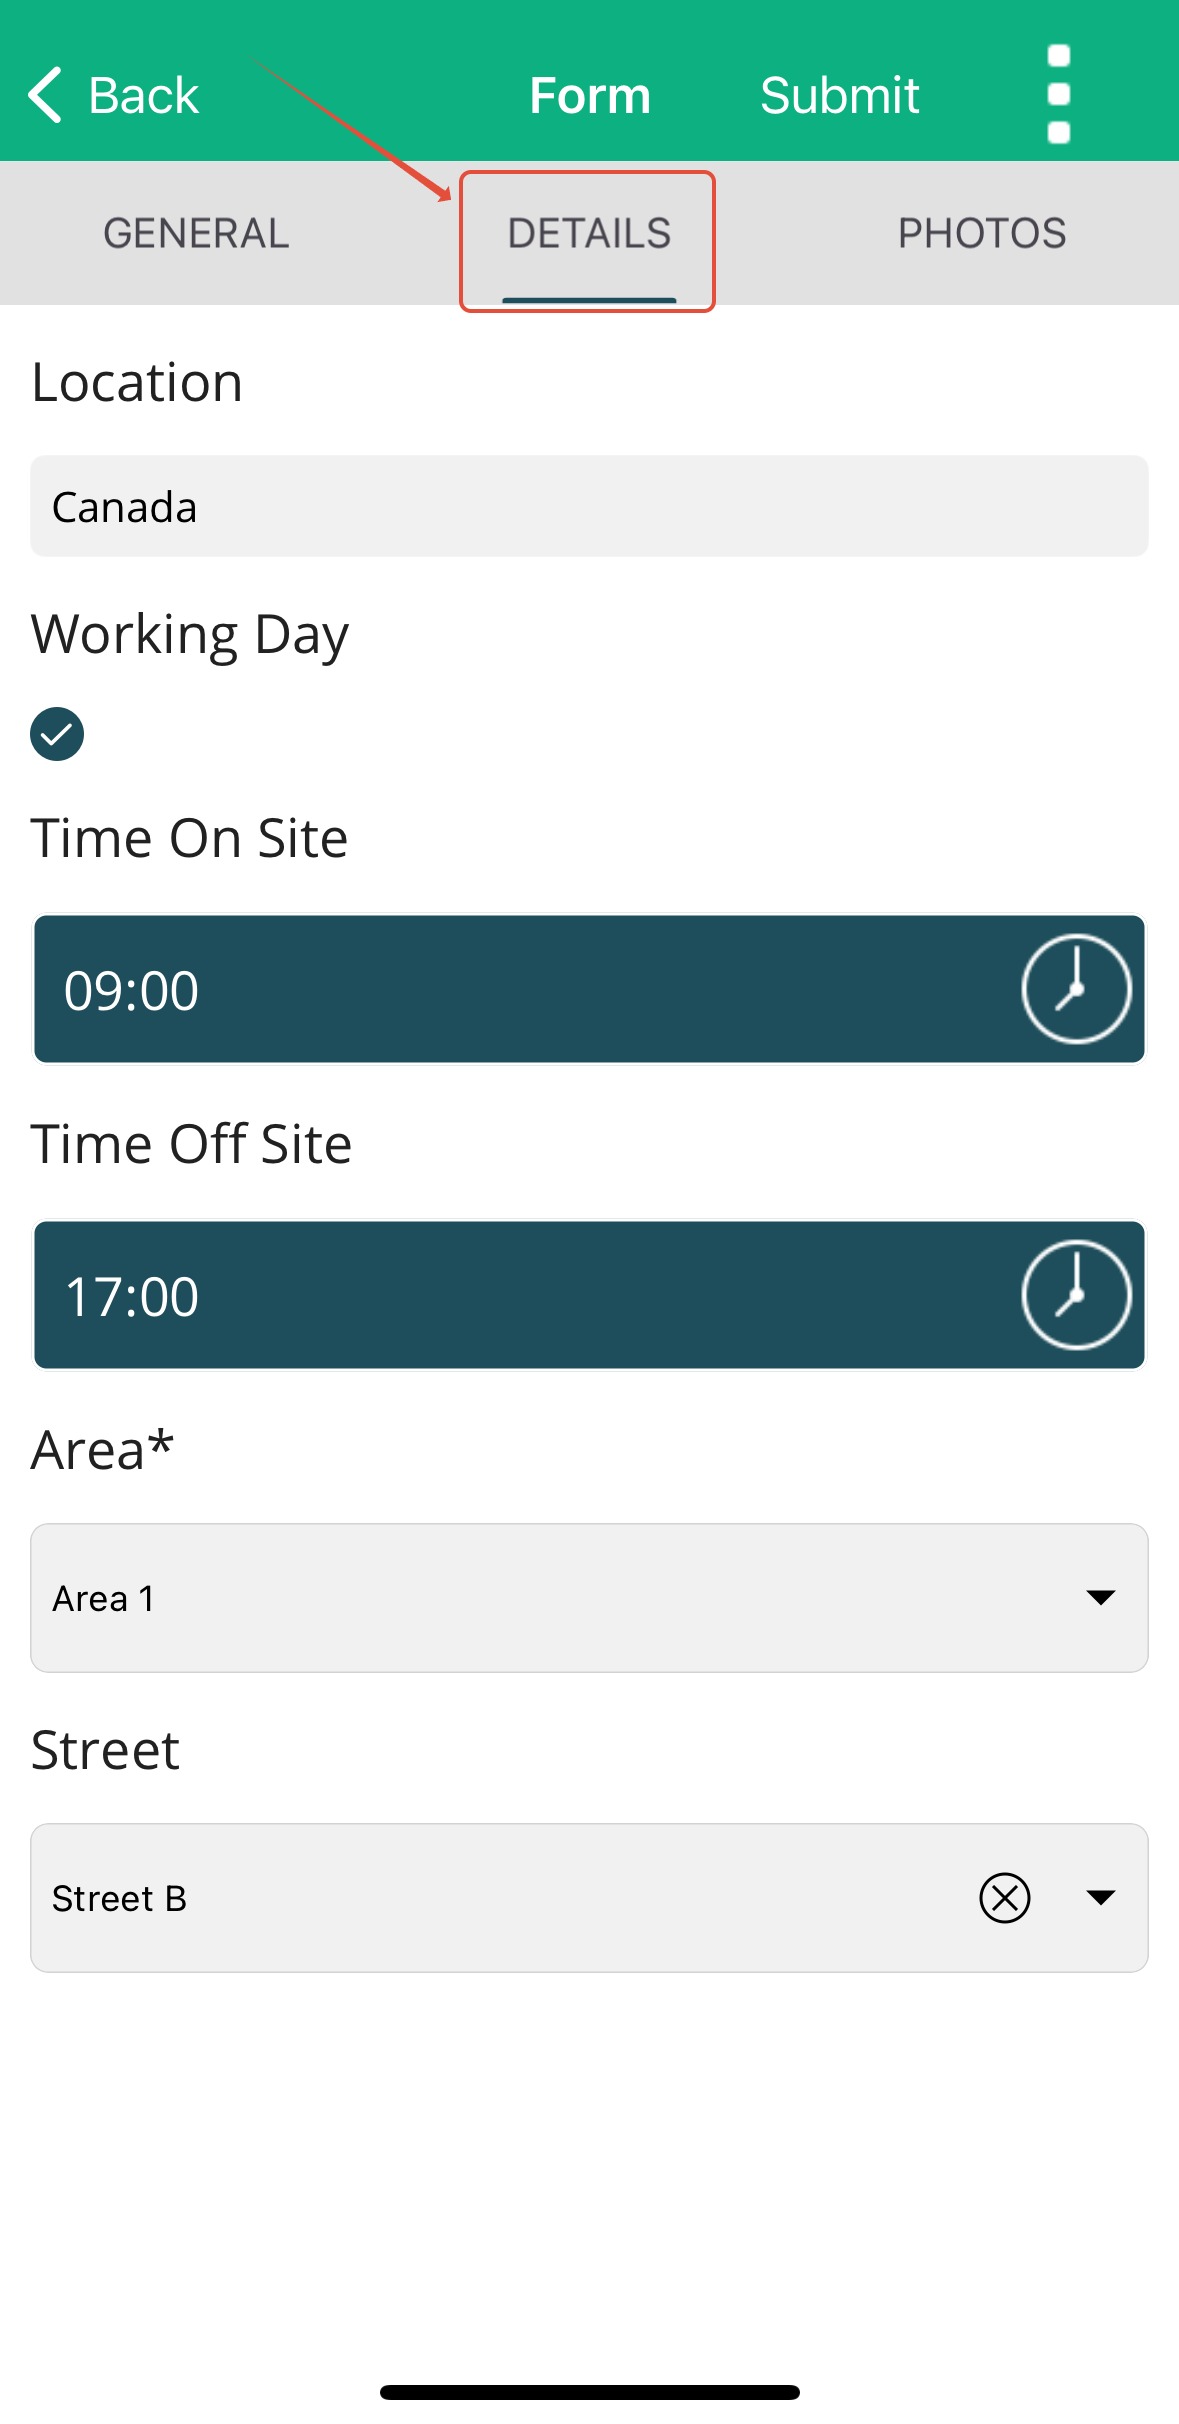
6. In the Details Tab:
Complete the required fields tailored to your report.
Mandatory fields (marked with an asterisk) must be filled as defined by your Account Administrator.
This parent inspection serves as the foundation for all sub-inspections you’ll add later.
Ensure all mandatory fields, marked with an asterisk, are completed as per your Account Administrator's settings. Adding Photos
Photos provide essential context to your inspection report.
1. Navigate to the Photos tab.
2. Tap Add Photo/Sketch to:
Upload from your gallery,
Capture a new image, or
Create a sketch.
 |  |
3. Use the Markup feature to annotate photos with shapes, arrows, or text. 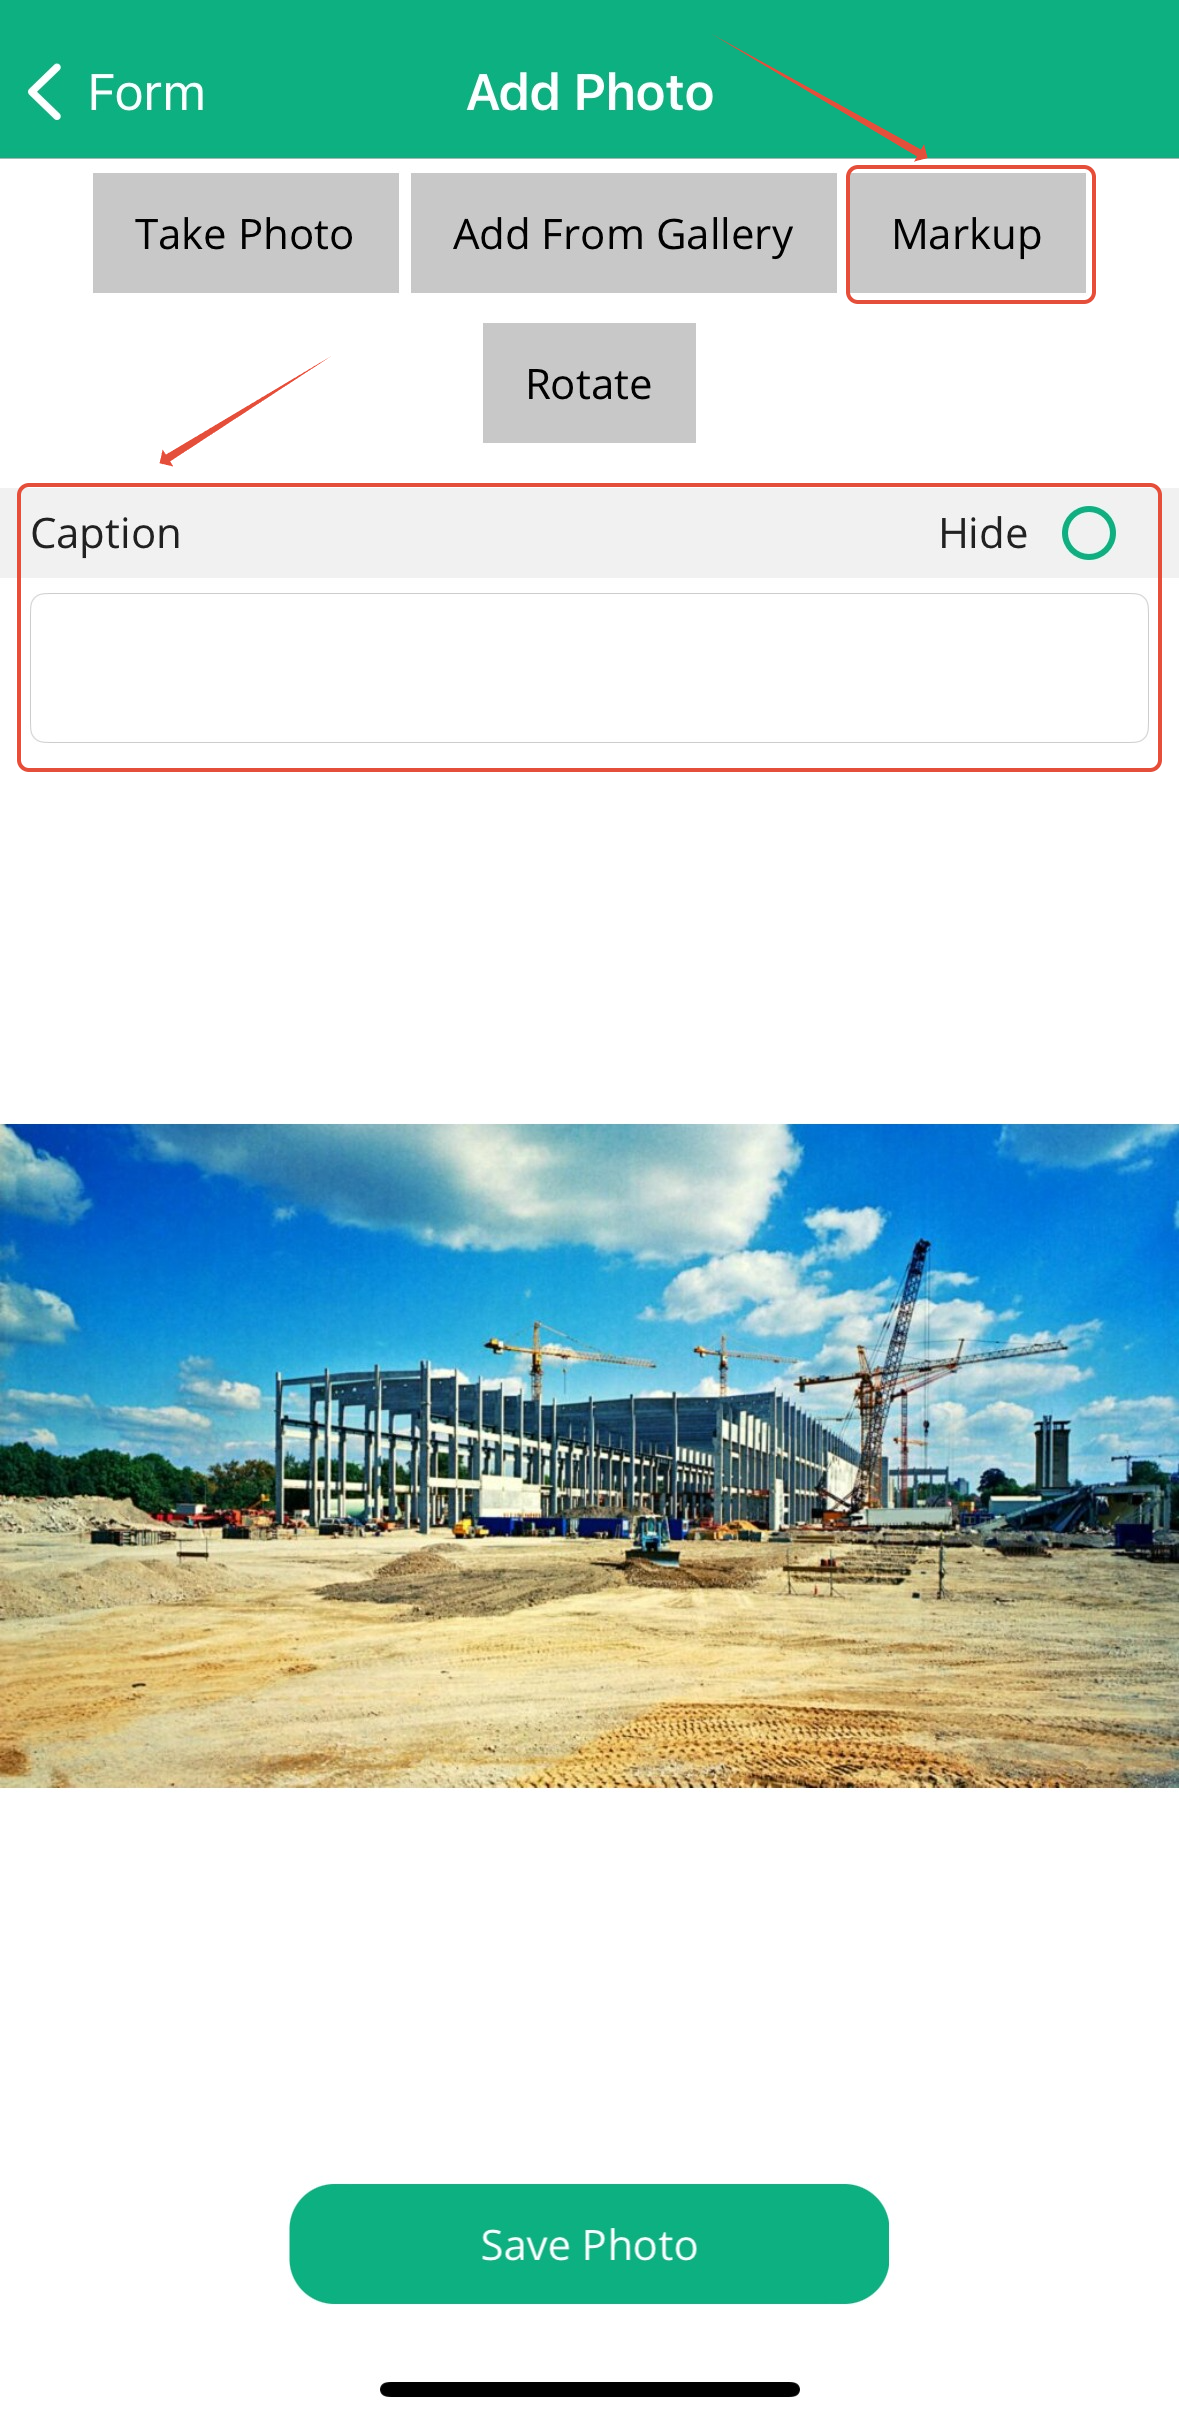
4. Add captions to provide clarity and make the report easier to review later.
All images are automatically timestamped and linked to the report.
Submitting the Parent Inspection
When your parent inspection is ready:
1. Tap Submit to upload it to the Builterra server.
2. Once submitted, the inspection will appear under the Submitted tab in the Inspection Portal (web) as well as in the mobile app.
3. If you’re offline or waiting for additional details, you can save your inspection as a draft. Drafts remain on your device until submitted.
Adding Sub-Inspections
Sub-inspections allow you to add specific details (e.g., Contract Items, Equipment, Labour) under the parent inspection.
1. Open the submitted parent inspection.
2. From the Sub-Inspections dropdown menu, select the type of sub-inspection you want to add.

3. Tap on the 'Add' button once you select a sub-inspection from the drop-down list

4. Enter the required details for the chosen sub-inspection (e.g., equipment used that day).
6. Tap Submit to save the sub-inspection under the parent inspection.
Repeat this process for as many sub-inspections as required.
Submitting Options
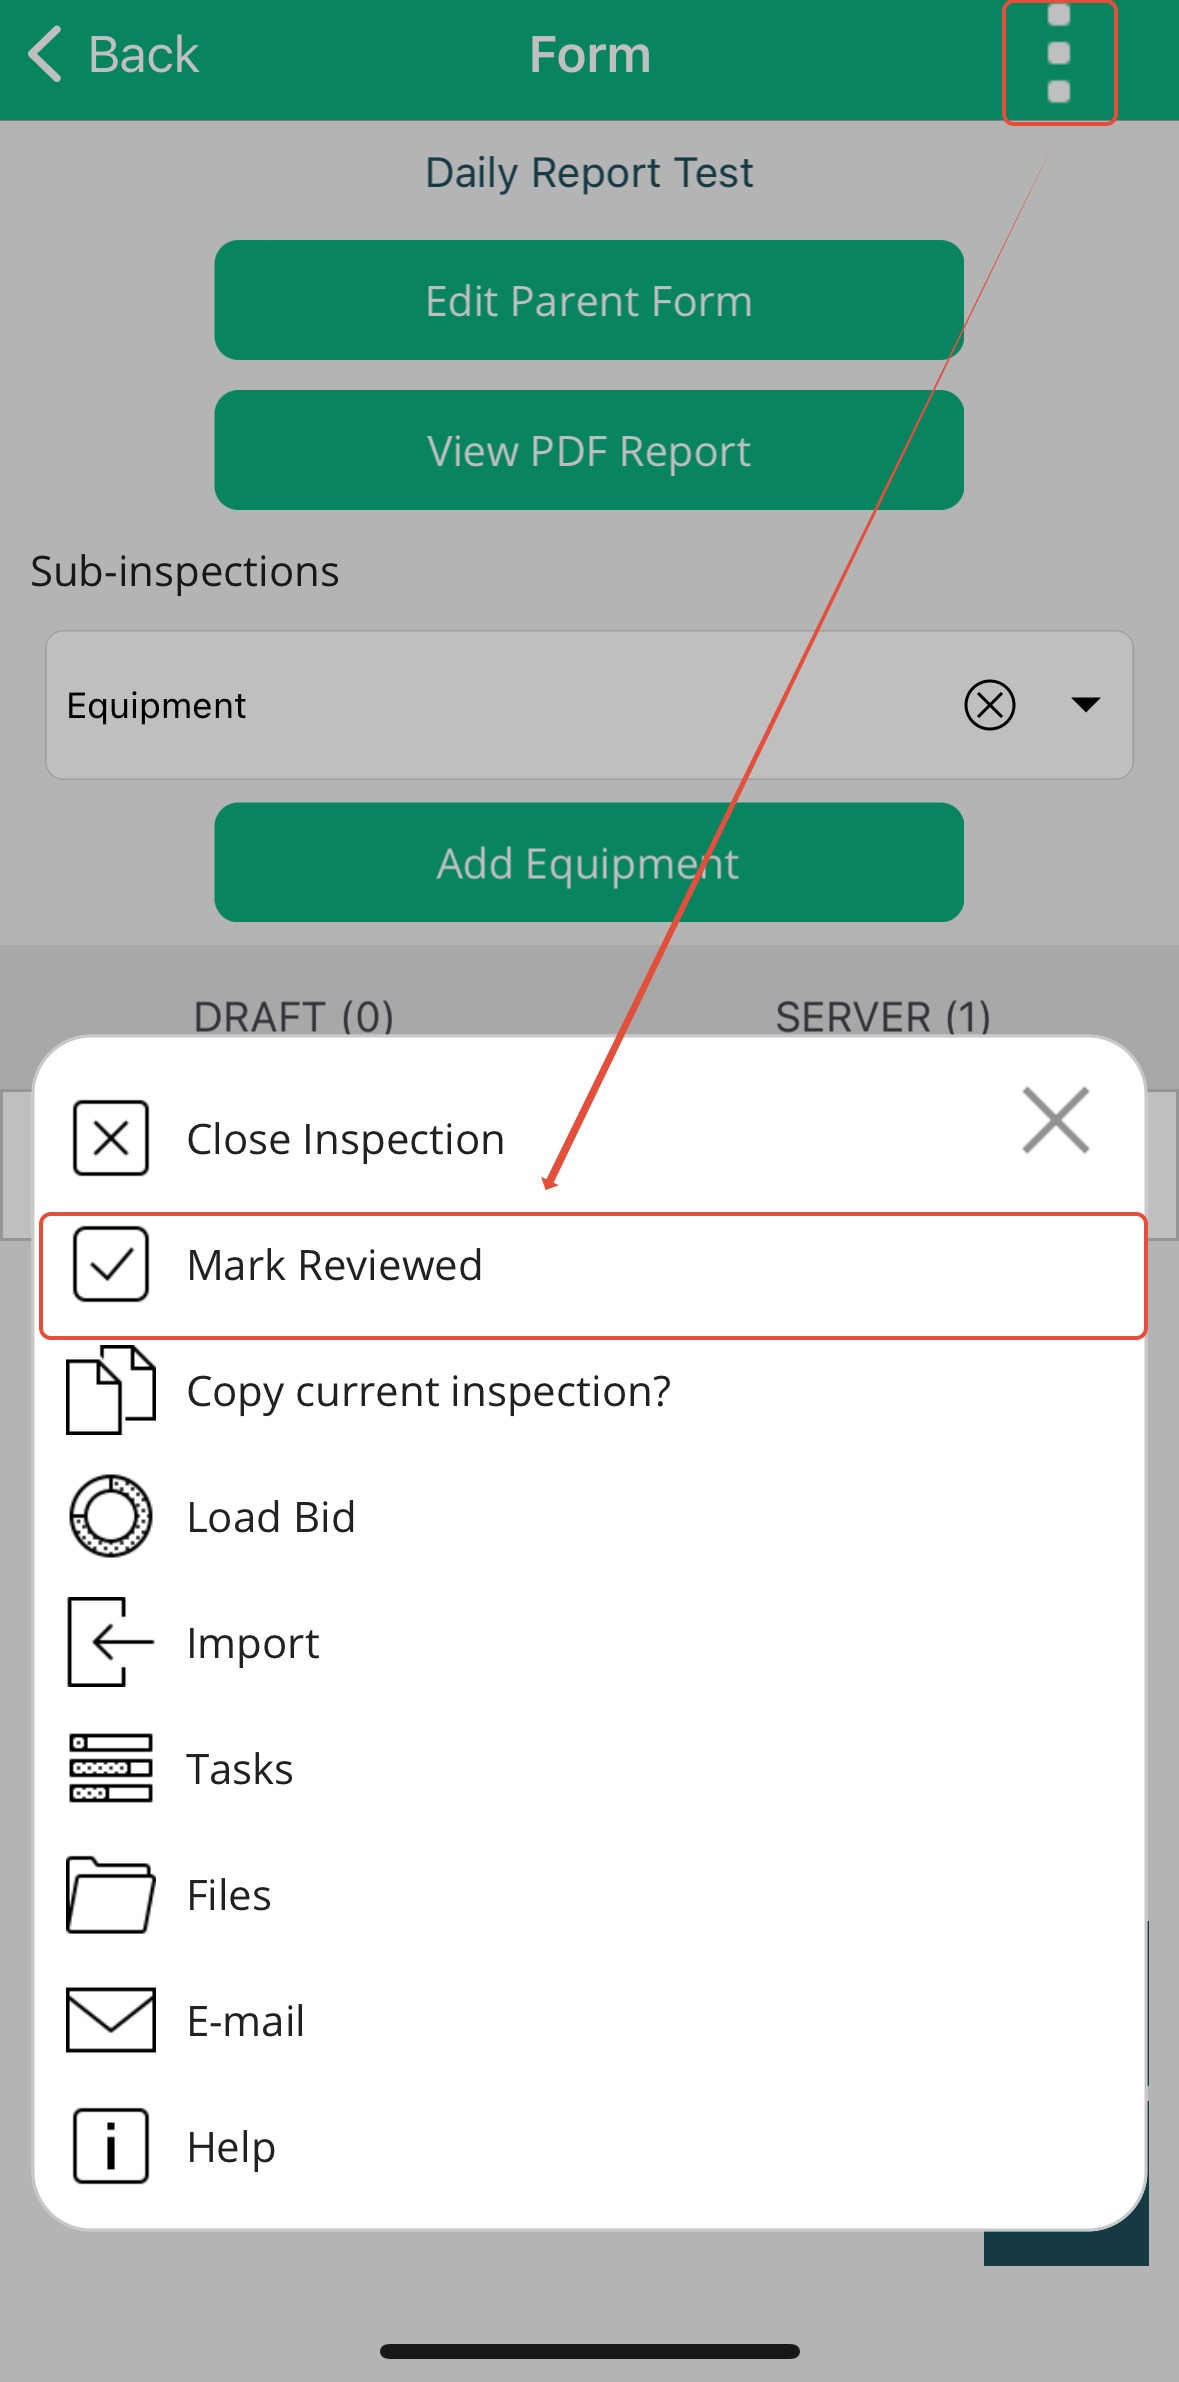
Once your inspection is complete, additional options are available by tapping the three white dots in the top-right corner:

| Close Inspection | Closes the report, preventing further edits on the mobile app. |
| Mark Reviewed | Marks the report as reviewed and approved, but allows further edits if necessary. |
| Copy Current Inspection | Duplicates the current inspection into a new report. |
| Load Bid | Loads project sections, tables, pay items, and quantities linked to your bid. |
| Import | Imports data from sub-inspection templates. |
| Tasks | Displays open tasks and upcoming deadlines linked to the inspection. |
| Files | Accesses related project or inspection documents. |
| Sends the inspection report to internal or external stakeholders. | |
| Help | Opens the Builterra Online Help Wiki. |
These options make it easy to manage, distribute, or extend your inspections.
Marking as Reviewed - left off
The Mark Reviewed feature adds accountability and ensures accuracy:
1. Open your inspection.
2. Tap the three white dots.
3. Select Mark Reviewed.
This action:
Marks the inspection as Closed, preventing edits from the mobile app.
Adds your digital signature from your Builterra profile to the downloaded report (if required).
Note: Check with your Account Administrator to confirm whether signatures are required for your reports.
Final Thoughts
By following this guide, you’ve learned how to create, submit, and review a Multi-Visit Report in the Builterra Pro app. This workflow is ideal for documenting ongoing inspections such as Daily Reports, where consistency and detail are critical.
If you prefer a visual learning experience, check out our video tutorial on creating Multi-Visit Reports.
Next steps
Now that you’re comfortable with Multi-Visit Reports, explore:
Customizing Builterra Pro Settings – Tailor the app to your workflow.
Creating & Completing Tasks in Builterra Pro – Stay on top of daily activities and deliverables.
Don’t forget to provide feedback below on whether this article was helpful.
Recommended Articles
How do I Create and Complete Tasks on Builterra ProHow do I Create Templates and Import Items on Builterra ProHow do I Configure my Builterra Pro AppWas this article helpful?
That’s Great!
Thank you for your feedback
Sorry! We couldn't be helpful
Thank you for your feedback
Feedback sent
We appreciate your effort and will try to fix the article